How to Grow Onions: Day Length Decides Your Bulb Size
Onions bulb on day length, not on age — so the wrong variety for your latitude never sizes up. How to pick the right type, plant it, and feed it to a full bulb.

On this page
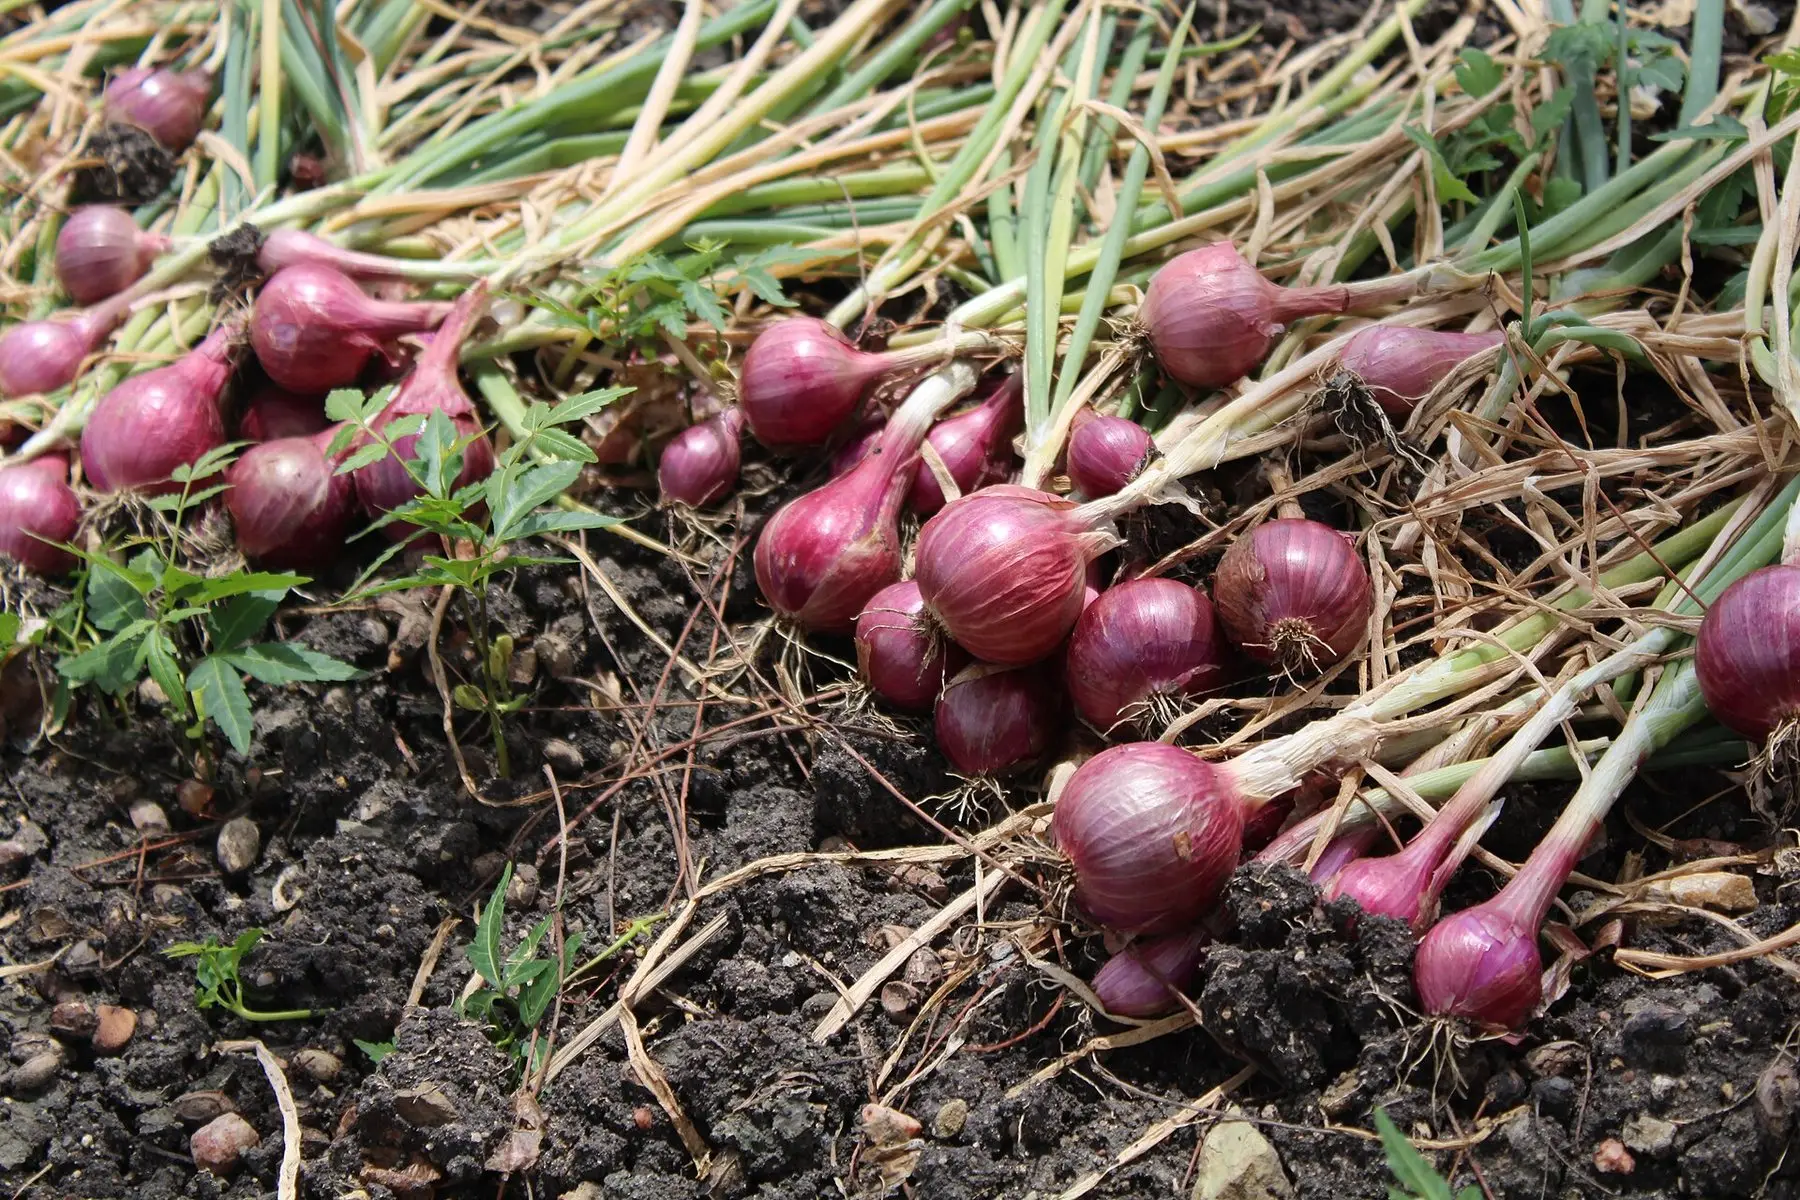
Onions are the crop most often grown wrong for a reason nobody mentions on the seed packet rack. They do not bulb when they reach a certain age or size. They bulb when the days reach a certain length — and if you buy the wrong type for your latitude, the plant will do everything right and still hand you something the size of a golf ball.
The day-length rule
This is the whole game, so it is worth being precise about it.
An onion plant grows leaves until the day reaches a trigger length, then switches over and pours everything into the bulb. Each leaf it managed to grow before that switch becomes one ring of the bulb. More leaves at the moment of switching means a bigger onion — and that is why planting date and variety type matter more than anything you do later.
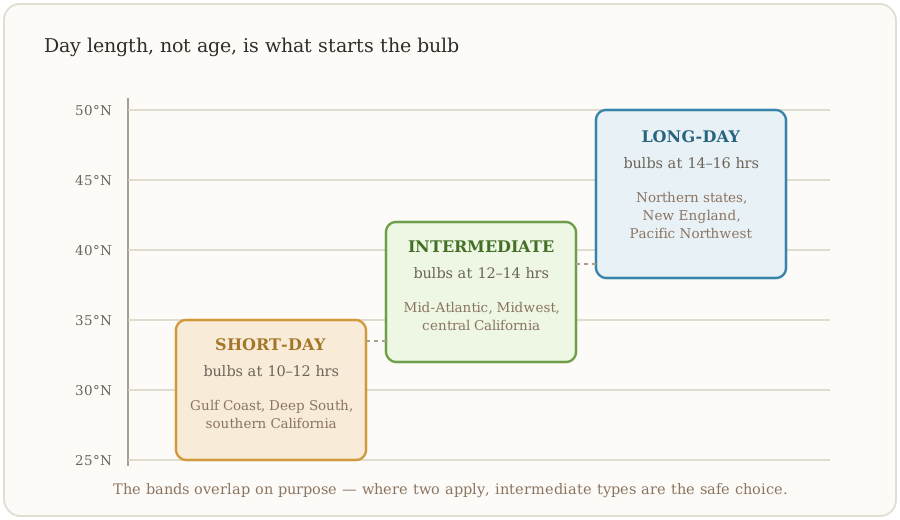
| Type | Bulbs at | Best above/below | Rough region | Notes |
|---|---|---|---|---|
| Short-day | 10–12 hrs | Below ~35°N | South, Gulf, SoCal | Planted in fall, harvested spring; mild, poor keepers |
| Intermediate | 12–14 hrs | ~32–42°N | Mid-Atlantic, Midwest, central CA | The safe pick if you are unsure |
| Long-day | 14–16 hrs | Above ~38°N | North, New England, Pacific NW | Pungent, best storage life |
Plant a short-day onion in Minnesota and it will begin bulbing in late spring, after only a handful of leaves, and stop. Plant a long-day onion in Texas and the day never gets long enough to trigger bulbing at all — you get a large green plant and no onion.
If you only remember one thing
Buy onions labeled for your region, not just by variety name. Reputable seed catalogs list the day-length type on every onion. If a listing does not state it, that is a reason to buy elsewhere.
Seed, sets, or transplants
All three work. They trade convenience against size and storage life.
Sets are small dormant bulbs from last season. They are the easiest and quickest option and tolerate rough handling, but because they are already in their second year of growth they bolt readily if stressed by cold or drought, and they generally produce smaller bulbs. Choose sets under about ¾ inch across — larger ones bolt more.
Seed takes the longest and needs an indoor start, but gives you the full variety range, the biggest bulbs, and the best keepers. Onion seed is notoriously short-lived; buy it fresh every year rather than sowing what is left in the packet.
Transplants — bare-root bundles sold in spring — are the middle ground, and are how most serious growers who do not start their own seed do it.
Planting and spacing
Onions are terrible competitors. They have fine, shallow roots, upright leaves that shade nothing, and no ability to push through compacted ground. Almost every cultural problem traces back to one of those three facts.
Give them full sun and soil forked loose with 2–3 inches of compost. Set plants 1 inch deep — deep enough to stand up, no deeper, because a bulb buried too far cannot expand sideways. Space at 4 inches for cooking onions and 6 inches if you want the big ones; spacing directly limits final diameter.
Plant as early as the ground can be worked in spring. Established onions shrug off frost down to about 20°F, and the earlier they go in the more leaves they build before day length flips the switch.
Weed by hand, not with a hoe
Onion feeder roots sit in the top two or three inches of soil. A hoe run through the row severs them, and the plant stalls for weeks afterward. Hand-pull, or mulch the bed to keep weeds down in the first place.
Feeding, and when to stop
Nitrogen builds leaves, and leaves become rings. Side-dress every two to three weeks through spring with a nitrogen-rich fertilizer — blood meal, feather meal, or a balanced organic feed.
Then stop, and stop deliberately. Once the bulbs begin to swell and push the soil up, further nitrogen goes into thick, green, sappy necks. A thick neck never dries down properly, and an onion that does not dry at the neck is an onion that rots in storage within a month.
Water an inch a week and keep it even. Onions that dry out and then get soaked during bulbing split their skins, and split onions do not keep.
Harvest and curing
When about three-quarters of the tops have collapsed at the neck of their own accord, the crop is done. Lift the whole bed with a fork on a dry day.
You will read advice to bend the tops over yourself to hurry things along. Do not — it interrupts the plant’s own dry-down and measurably shortens storage life. Let them fall.
Cure with the tops left on, somewhere dry, shaded, and well-ventilated, for two to three weeks. They are ready when the necks are papery all the way through and the outer skins rustle. Then trim the roots close, cut the tops to about an inch, and store cold and dry — 32–40°F, in mesh bags, crates, or braids.
Eat the thick-necked ones first
Sort as you store. Any onion with a soft or thick neck, a split skin, or a flower stalk will not keep. Set those aside for the kitchen and store only the hard, tight, fully cured bulbs.
Step by step
- Time
- P100D
- Cost
- $10
- You need
- Onion seed, sets, or transplants in the right day-length type, Compost or aged manure, Nitrogen-rich fertilizer
- Tools
- Trowel, Garden fork
Pick the day-length type for your latitude
Short-day onions bulb at 10–12 hours of daylight and suit the South (roughly below 35°N). Long-day onions need 14–16 hours and suit the North (above 38°N). Intermediate or day-neutral types cover the band between, and perform acceptably almost anywhere. This single choice decides whether you get a bulb or a scallion.
Start seed 8–10 weeks before your last frost
Sow indoors in a tray at a quarter-inch deep, 60–70°F. Onion seed loses viability fast, so buy fresh each year. If you are using sets or bought transplants instead, skip this step — sets are the easier route for a first crop, seed gives the bigger bulbs.
Trim seedlings to 4 inches
When indoor seedlings flop over at about 5–6 inches, cut them back to 4 inches with scissors. Trimming redirects growth into the base and stops a tangled mat, and it can be repeated as often as needed until planting out.
Prepare a loose, rich, weed-free bed
Fork 2–3 inches of compost into full sun. Onions have shallow, thread-like roots that cannot push through compacted soil or compete with weeds, and a bulb only expands as easily as the soil around it lets it.
Plant as early as the soil can be worked
Set transplants or sets 1 inch deep and 4–6 inches apart, in rows 12 inches apart. Onions are hardy to about 20°F once established. Planting early matters because every leaf grown before bulbing starts becomes one more ring on the finished bulb.
Feed nitrogen until the necks soften, then stop
Side-dress with a nitrogen-rich fertilizer every 2–3 weeks through the leaf-growing phase. Stop as soon as bulbs start swelling and the soil begins to crack — late nitrogen produces thick necks and soft bulbs that will not store.
Keep the bed consistently moist and weeded
Give about an inch of water a week. Uneven watering during bulbing causes splitting. Weed by hand rather than hoeing deeply, since onion roots sit in the top few inches and are easily severed.
Harvest when the tops fall over
When about three-quarters of the tops have flopped at the neck, lift the whole bed with a fork. Do not bend the tops over yourself to force it — that shortens storage life. Pull on a dry day.
Cure for 2–3 weeks before storing
Lay the plants somewhere dry, shaded, and airy with the tops still attached until the necks are papery and the skins rustle. Then trim the roots and cut the tops to an inch, and store at 32–40°F in mesh or a braid.
Common questions
How long do onions take to grow?
Why are my onions so small?
Should I grow onions from seed or sets?
Can you grow onions in containers?
What happens if my onions flower?
Backyard Weekly
Know what to plant, week by week
Free planting calendar. Join the weekly email for seasonal jobs, fixes for what is going wrong, and gear worth buying.
Set MONETIZATION.email.endpoint in src/config/site.ts to enable this form.
By subscribing you agree to our privacy policy. Grow In Backyard will never sell your address.
Keep reading
How to Grow Garlic: Plant in Fall, Harvest in July
Garlic is the easiest crop in the garden if you plant it at the right time. Here is the full cycle — choosing bulbs, planting depth, mulch, scapes, and harvest.
When to Harvest Garlic (Count the Brown Leaves)
Garlic is ready when three or four lower leaves have browned and five or six are still green — usually July. How to read the plant and test before you dig.
How to Grow Asparagus: Three Years to the First Real Cut
Asparagus is a twenty-year perennial that pays nothing for two seasons. Bed preparation, crowns versus seed, and the cutting discipline that keeps it going.
How Deep to Plant Potatoes (And Why Hilling Matters More)
Four inches at planting, then hill as they grow. Why planting deep in cold spring soil backfires, and how depth differs in containers and no-dig beds.